Oven-Fried Crispy Chicken Sandwich
If you’re craving a crispy chicken sandwich without the mess of deep frying, this Oven Fried Crispy Chicken Sandwich is the perfect solution. The chicken bakes up golden, crunchy, and full of flavor while staying lighter than traditional fried chicken and, of course, Gluten Free.
GLUTEN FREE LUNCH RECIPESGLUTEN FREE DINNER RECIPE
Lauren Vasnelis
7/4/2026
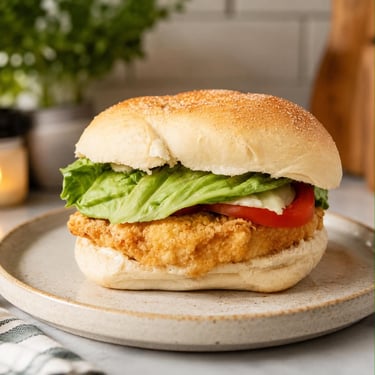
Oven Fried Crispy Chicken Sandwich
If you’re craving a crispy chicken sandwich without the deep fryer drama, this oven-baked version brings all the crunch with none of the oil splatter chaos. The coating bakes up golden and crackly, thanks to a clever mix of gluten-free flour and Rice Krispies for that unmistakable crispy bite.
Stack it onto a soft bun, of your choosing, with fresh lettuce, juicy tomato, and your favorite sauce, and you’ve got a sandwich that feels indulgent but stays oven-light.
Servings: 4 sandwiches
Prep Time: 20 minutes
Cook Time: 35 minutes
What Makes This Sandwich Work
Chicken breasts stay juicy and tender inside while the coating turns crisp and golden in the oven. The real texture magic comes from the Rice Krispies, which act like tiny crunch amplifiers, giving you that “fried” bite without frying anything.
A quick almond milk and egg dip keeps everything moist and helps the breading cling like it means it.
Ingredients
Chicken
2lb (4 Pieces) Boneless Skinless Chicken Breast
Batter
½ cup almond milk
1 egg
1 tablespoon apple cider vinegar
Breading
1½ cups Bob’s Red Mill Gluten-Free 1-to-1 Baking Flour
½ cup Rice Krispies cereal, lightly crushed
1½ teaspoons baking powder
2 teaspoons paprika
2 teaspoons Mrs. Dash Garlic & Herb seasoning
Salt, to taste
Black pepper, to taste
Garlic powder, to taste
Extra virgin olive oil spray (optional for added crispiness)
For Serving
Gluten-free or regular sandwich buns
Lettuce
Tomato
Mayonnaise or preferred sauce
Instructions
Preheat oven to 425°F and line a baking sheet with parchment paper.
Set up two deep plates for dredging.
On the first plate, whisk almond milk, egg, and apple cider vinegar.
On the second plate, combine flour, Rice Krispies, baking powder, paprika, seasoning blend, salt, pepper, and garlic powder.
Coat each chicken breast in the flour mixture, pressing firmly so it adheres.
Gently dip into the egg mixture, coating both sides.
Return to the flour mixture for a second coat, pressing again to build that thick crust.
Place coated chicken on the baking sheet.
Lightly spray or drizzle with olive oil.
Bake for 30–35 minutes. I consider flipping optional to help create a crispier exterior, but only flip after the 18 minute mark.
Optional but highly recommended: broil 1–3 minutes at the end for extra crunch. Watch closely. This will burn in an instant.
Assemble on a gluten free bun with lettuce, tomato, mayo, and your favorite toppings, over a salad, or served with your favorite gluten free side dishes (like my Oven Roasted Corn-on-the-Cob)
Notes
Light oiling is the difference between “crispy” and “why is this soft.”
Flipping after the 18 minute mark keeps both sides evenly golden but let's the breading set first.
Broiling at the end is like turning the volume knob on crunch.
Leftovers reheat beautifully in an oven or air fryer to revive texture.
Store in the fridge for up to 4 days.
FAQ
Can I use regular flour?
Yes. All-purpose flour works if you’re not keeping it gluten-free.
Why Rice Krispies?
They create air-pocket crunch that mimics fried chicken texture in a baked form. Also try crushed up Corn Flakes.
Can I use chicken thighs?
Absolutely. They stay extra juicy and work beautifully here.
Can I turn this into tenders?
Yes. Slice before coating and reduce bake time until 165°F internal temperature.
Can I freeze it?
Yes. Cool fully, freeze up to 3 months, and reheat in oven or air fryer.